10 step guide to preparing your home for Winter.

It’s that time of the year again! Take advantage of the Fall weather and knock out these 10 steps before the snow comes. A little maintenance goes a long way, and it isn’t very difficult.

1) Add caulking around doors and windows: Caulking is inexpensive, easy to install and very important for weatherproofing your home. Find the gaps and cracks on the interior and exterior and seal them up.

2) Replace worn weatherstripping around door jams: Weatherstripping is the rubber or foam strip that helps seal your doors. Over time, they wear out and let the conditioned air escape to the outdoors. Check the entire area around the door. If you can see daylight around the perimeter of a door when it is shut, you’re losing energy.

3) Drain irrigation systems: Water left sitting in the irrigation system can freeze and cause major damage. Hire a pro to blow out the system with compressed air and turn off the entire system until spring.

4) Disconnect hoses: Turn off your exterior water taps, drain the hoses and store them inside or in a garden box.

5) Check your downspouts: Accumulated snow on your roof will eventually melt, sending hundreds of gallons of water down the gutter system. Make sure it gets diverted away from your house with downspouts and extensions. Check the regularly for ice build-up and other clogs.

6) Have the chimney inspected: Even if you do not use your fireplace as a primary heating source, you should have the chimney inspected and cleaned every year. If there is a problem with your furnace, you will need heat until it is fixed.

7) Have your furnace serviced: It goes without saying, your furnace is incredibly important during the winter. An annual service by a professional will help keep it running smoothly and efficiently.

8) Store your mower: Gasoline engines need to be properly maintained and prepped for storage. Check the manufacturers recommendations regarding long term storage of the engine. You may need to drain fluids and use fuel additives. If your mower takes batteries, charge them up and store them indoors. They will last much longer.

9) Insulate water lines: If you have water lines running inside of an exterior wall, consider adding insulation to them. Check your basement, crawlspaces and garages as well. Freezing weather can wreck havoc on the water inside these lines. If you find a frozen pipe during the winter, call a professional plumber immediately. Attempting to thaw out a plumbing pipe can cause it to burst. Call a pro!

10) Service the water heater: Water heaters need maintenance as well, and they will inevitably be working harder in colder temperatures. Now is a great time to have a professional drain the tank and service the entire unit.

There are plenty of other steps you can take to prepare for the Winter months, but these are some of the most important ones. Most of these can be completed by yourself and a professional in just a couple days. If you want more information about your home and help deciding what needs to be done, consider an Annual Home Maintenance Inspection by a Certified Professional Inspector.

A little gutter maintenance goes a long way.

As a homeowner, you know the importance of maintaining your home and avoiding large repair costs. Cleaning your gutters might be easier than you think, and it’s very important.

You may not consider Castle Rock (or Colorado) a seriously wet area with a lot of rainfall, but it doesn’t matter. Your gutter system is just as important here as it is with other areas of the country that receive far more rain. Hundreds (and even thousands) of gallons of water can fall from your roof in a typical storm. In fact, for every 1000 square feet of roof area you have, there will be over 600 gallons of water collected on the roof for every 1 inch of rainfall. You do NOT want that much water landing in the wrong places.

So what do the gutters do? The gutter system serves a few purposes:

1) To collect water run-off during rain, hail and snow melt.
2) To consolidate and control the flow of the water.
3) To direct the water safely away from your siding and foundation. (At least 6 feet)

Without accomplishing these three things, major damages can occur after just one rainfall. Leaves, sticks, new roofing materials, birds and bees nests can clog up those gutters even when they are professionally installed and sized. Over time, seams and joints in the gutter system can come apart and create issues.

Here are some tips for cleaning your gutters out and doing routine maintenance:

1) Clean them at least once per year: The Spring season brings rain, so get up there and have a look before it starts. This will also help you catch any damage from the Winter snow and ice. Another great time to do this is in the Fall after all the leaves are down. If you are putting up Christmas lights, brings some gloves and a trash bag and scoop out all the debris.

2) Look for gaps and separations: Some gutters are seam-less, some are not. If there are seams, they should not be leaking. Check for any leaks near joints and corners as these areas are prone to damage. Local hardware stores carry sealants that are specifically for gutter material. Make sure the sealant is made for your type of gutter (Aluminum,Steel, Copper, etc.) Downspouts and their extensions are commonly disconnected as well. These are usually quite easy to reattach.

3) Check for low spots and loose brackets: Gutters need to flow downhill, so they should have a slight downward slop to a downspout connection. There should be roughly a 1/2inch slope for every 15ft. If you see deep puddles of water resting in the gutters, you may need to hire a professional to re-adjust the slope. Also, look at the attachment points where the gutters are held to the roof. Often times, these areas have loosened up and need to be tightened or new hardware needs to be installed.

4) Consider installing leaf guards: Leaf guards are long pieces of material that are permanently installed onto the tops of the gutter. They allow water to drain into the gutter system as normal, but filter out any leaves or debris first. There are several different manufactures but they all serve the same purpose. Some are cheap, some are expensive. If you have large trees that drop leaves into your yard every fall, you probably want to consider these devices.

5) Hire a pro: There are gutter system contractors in the area that will do the yearly maintenance for you. Some roofing companies also provide maintenance and adjustments. If getting on a ladder isn’t your thing or you already have work being done on the roof, it’s probably best to let the pros do it. An annual Home Maintenance Inspection usually covers the gutter systems as well. Check with a local home inspector that offers these plans.

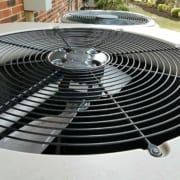
R22 and older Air Conditioners

You may have an Air Conditioning unit at your home that uses R22 refrigerant. If your home inspector or HVAC professional has mentioned this to you, here is what you need to know.

Basically, R22 refrigerant (also called HCFC-22 or Freon) was widely used in many air conditioners up until about 2010. This product is being phased out of production due to environmental concerns from the EPA (read more here). If your AC unit is older than 2010, it likely still has R22 inside. You can look up the age here. The concern is that the cost to add R22 into a unit for repairs or maintenance will likely be expensive, and that cost will only increase with time as there isn’t a large supply. While the AC may be working just fine, it is important to understand costs to repair may not be feasible. Upgrades to a newer air conditioning system will likely be the course of action.

Most newer air conditioners use a more environmentally friendly refrigerant product called R-410A. You can easily find out which product you have by reading the manufacturers data plate that is mounted on the unit.

This is HCFC-22 (Commonly R22 or Freon)

This is R-410A, the new standard in Refrigerant.

Why does your exterior concrete crack and move, and what to do about it.

On nearly every home we inspect in Colorado, there is inevitably some issue that make it into our report concerning exterior concrete. Cracking sidewalk slabs, heaving driveways and sinking front porches are extremely common defects that make it into our reports. Let’s discuss why concrete on grade (aka “flatwork) is always moving and options you have for maintenance and repairs.

The Basics:

When concrete is first laid on the ground, some work is required to prepare the grade for the concrete. Typically this means removing debris and poor soils, re-filling the area with the proper fill dirt and leveling everything out. The area should then be compacted to a certain extent so the concrete lays flat and the soil does not sink over time with the added weight. Steps should be taken to shed water away from the concrete. Control joints are added in specific locations so when the slabs inevitably move, they do not create ugly cracks through the middle of the slab. A good example of this is a typical sidewalk that is made up of several slabs instead on one giant concrete path. The space between the slabs are the control joints.

The Problems:

Cracking- This happens for many reasons. Concrete can shrink when curing after installation and produce small hairline cracks. Slabs can sink or heave on one side while being stable on the other, creating a crack at the weak point. Too much weight on a surface can cause cracks to form. Concrete mixtures should be tested before they are poured to ensure they fit the application. For example, your patio doesn’t need to bear the same weight as your driveway, so the concrete mixtures should be different. We also expect cracks eventually on all concrete surfaces over time, so it is not always a defect, it’s just old.

Heaving- Anytime water or significant amounts of moisture saturate the underside of the slabs, heaving (lifting) can occur. The pressure from water can be immense. The hydro-static pressure from water alone can literally lift up your entire house, so the relatively light weight sidewalk slabs do not stand a chance. Any siding materials or deck posts that may be sitting on the slab will also lift, causing more damage. To make matters worse, water expands as it freezes. Here in Colorado, we have very frequent freeze/thaw cycles. On Monday it’s 10 below and snowing 10 inches, on Tuesday its 60 and sunny. All of that snow will melt, pool up somewhere, and unless it sheds away quickly will be freezing again by Wednesday. Hopefully it isn’t under your concrete slabs.

Sinking- Concrete sinks when something is going on underneath the slab. The soils may not have been compacted enough before installation, or water may have washed away the soils leaving a space for the heavy slab to sink. It is also possible that heavy objects have caused a slab to sink (your 67′ Buick shouldn’t be parked on the sidewalk, Randy).

Trip Hazards- This is one of the main reasons we (as home inspectors) call out concrete issues during an inspection. All of the previous defects above can cause an edge, or “lip” in the concrete that could cause a person to trip. We’re always looking out for safety issues and will not hesitate to add them to your report. It may not be a concern to you now, but it may be an issue for Grandma when she sneaks up to your house at 10pm all hopped up on Bingo Night and trips on the sidewalk that’s heaving. Consider Grandma, and have the problems repaired.

Notice a common theme here? Water! It’s not always the culprit, but water is definitely the root cause of many concrete issues. These slabs are often installed near the house and, more specifically, the gutter downspouts. When water drains out of the downspouts after a rain or snow melt (a LOT of water) it pools around and under the concrete slabs. This will cause premature erosion of the soils and introduce water. Add in some freezing temperatures and you can be certain the concrete will move significantly and cause cracking, heaving and sinking.

The Maintenance:

You don’t always know how the concrete was installed to begin with, but you can do a little maintenance to prolong the life of your concrete surface:

  • Sealers- Concrete sealers are a product that homeowners can apply on their own. These are applied like paint, are usually clear in color and are installed in very thin layers. Sealers help protect the concrete from harmful UV rays, and help seal the porous concrete material, basically helping to shed water off of the surface. Not all sealers are created equal, nor should you apply them without consulting a concrete professional first. It’s important to use the correct type of sealer, and to apply at the right time. Some are applied within a month after the concrete is poured, some are not. Consult a pro first.
  • Crack Repairs- Remember that water should shed away from concrete and not pool underneath it, right? One way water will get under the concrete is from a crack that has already formed. Patching these cracks with an approved concrete caulking material is one way to slow down the water intrusion. This is especially important on new, thin cracks that have recently formed. If your driveway is sloped downward to the street, large cracks along the lower part of the slab can accumulate a LOT of water runoff when it rains or the snow melts. Concrete caulking will only work on cracks that are up to about 1/2inch in width, so if you have a crack wider than that (none of my business!), you may have to use another type of filler. A concrete mixture could be used in that situation. When in doubt, call a professional.
  • Mudjacking- Ahhhh technology. There exists a way to lift an entire concrete surface in a consistent, quick, inexpensive and very effective way. It’s called mudjacking and it is now very popular. If the slab has sunk (or even just part of the slab has sunk), a mudjacking professional can inject mud or a polyurethane foam mixture under the slab and slowly raise the concrete to the desired height. It doesn’t take long to do, and it’s usually much cheaper than completely removing the old slabs and starting over. This technique can be used on just about any surface unless is completely full of cracks. In that case replacement is likely the only option. Check out this video (2 mins) to see it in action.

Do the preventative maintenance on your sidewalk, porch, driveway, patio and even garage floor and you will significantly prolong the useful life of your concrete surfaces. Left alone for years and it will surely destroy itself and be costly to replace. As always, call text or email us at Green Door Home Inspections with your questions. Happy to help.

Appliance life expectancy.

Every appliance in your home has an average life expectancy. Some appliances will last quite a long time ( I owned a 30yr old gas furnace at one point!). Others, not so much. So how do you know when to expect a replacement unit?

Several factors go into the expected longevity of any appliance like make, model, maintenance schedules and usage. Some manufactures may disclose that number for you, or you just have to do your own research.

Here is a guide from Consumer Research showing average life expectancy from the most common appliances in your home:

So, how old is your appliance? Check the manufacture’s label that is usually permanently installed on the unit itself. There may be an exact date of manufacture on that label, or there may be a code. Calling the manufacturer and providing the code and/or serial number is usually enough to verify age. You can also use this free website to look up most appliance information.

If you have any trouble, give us a call. As a home inspector here in Colorado, I can look up the information for you and find out if there have been any recalls on that specific unit as well. Here in Castle Rock, Colorado, Winters can be especially hard on furnaces and summers very hard on air conditioners. Do your maintenance and plan on budgeting for that inevitable replacement.

Post-rain inspection for the Homeowner.

How about that rain? Now is a great time to check your home for water issues.

When it rains hard in Colorado (like the storms last week!) take that opportunity to see how your home has handled the water. I recommend having a professional look over your home every year, but you can do this one on your own. Here is a quick (10 min) post-rain inspection anyone can do:

1) CHECK for pooling. Take a walk around your home and look for any water pooling, especially near the foundation.
2) CHECK for leaks. Take a peek in the attic and look at the ceilings. Look for any signs of water intrusion or leaks from the roof.
3) CHECK gutter system. Downspouts and gutters are essential to controlling the water from your roof. Look for clogs and loose/broken connections.

When it rains hard in Colorado, like the storms last week, take that opportunity to see how your home has handled the water.

Any questions? Give me a call!
720-598-0111
www.greendoorHI.com

#gutters #homeowner #diy #leaks