Before the Home Inspector arrives.

Use these 5 tips to prepare your home before the inspector arrives.

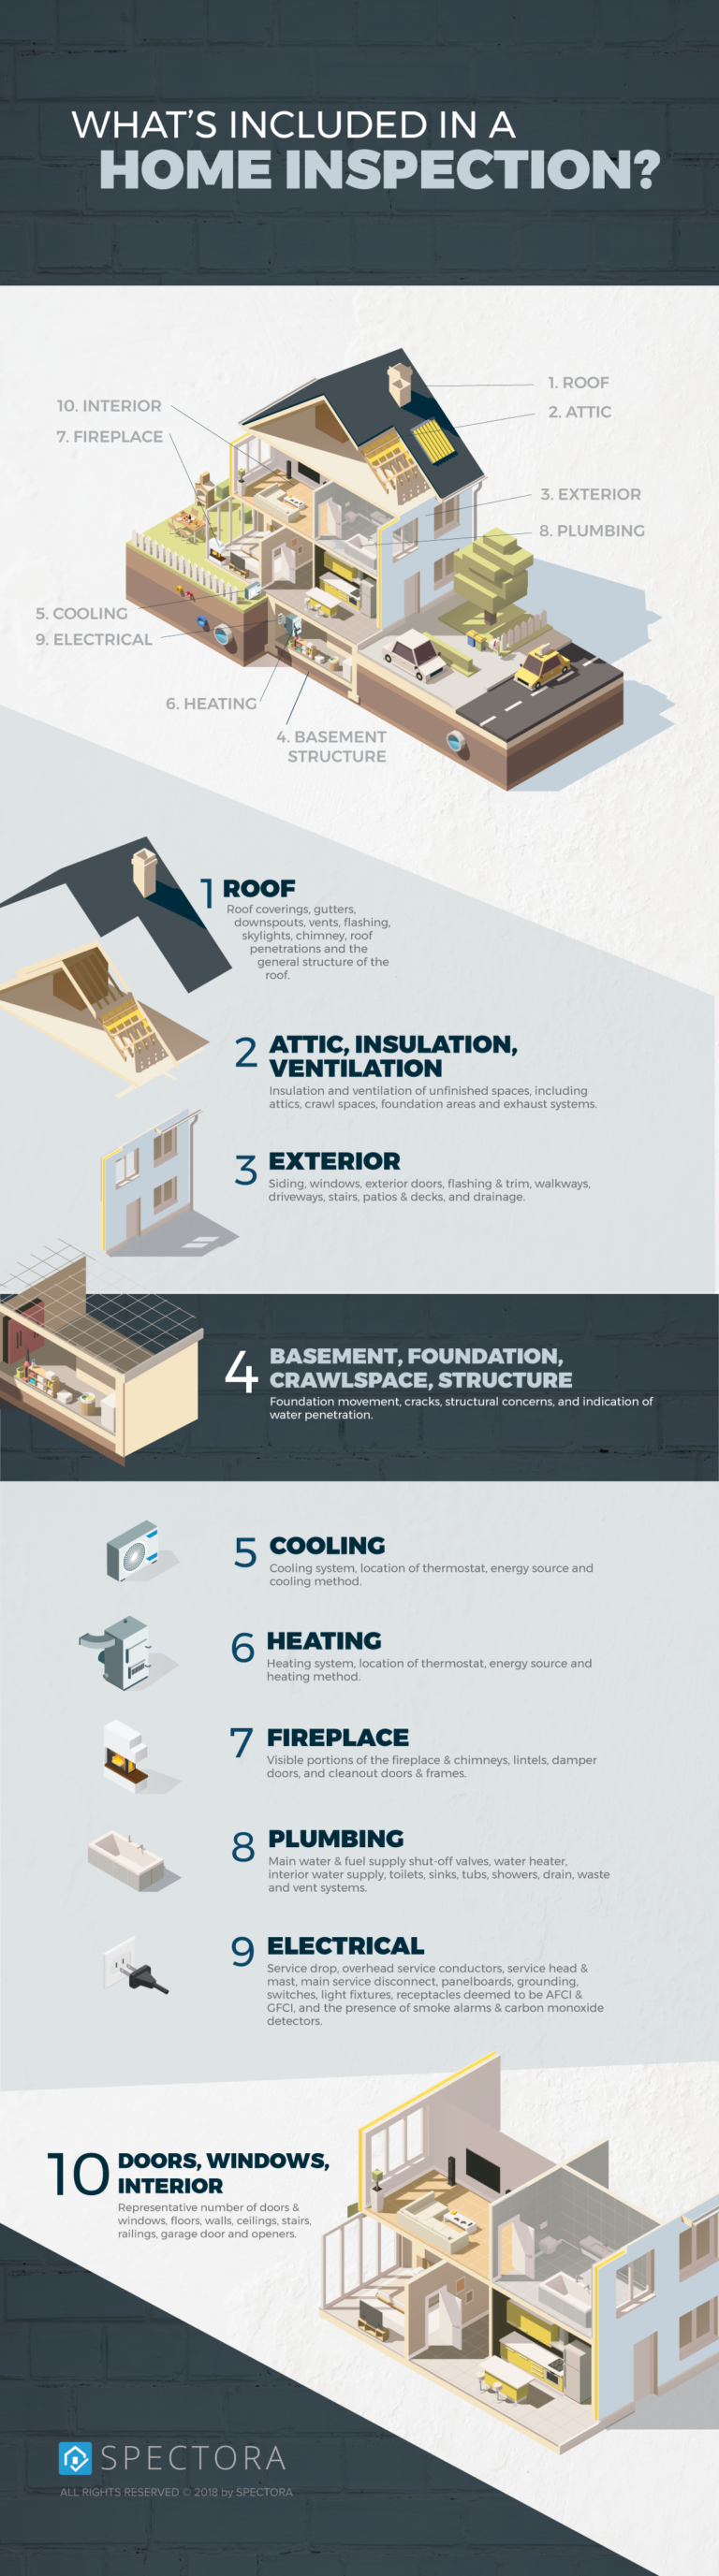
1) Make sure you give access to the entire home (Interior and Exterior). Obviously, the front door will need to be opened and the entire house will need to be unlocked. But think about other locks, door codes and access points that are not so obvious to guests. If an Inspector cannot access a crawl-space because there is a refrigerator blocking the access point or there is a security fence in the backyard without a key, the inspection will not be able to be completed on time. Make sure to let the inspector know of any home security codes as well. Your agent should be able to help you pass this information along. Read about what areas are going to be inspected here.

2) Clean up personal items. This is an important one. Inspectors will not move personal items in order to inspect areas of the home. Leaving items in the way can block an inspector’s view, and they will have to make note of that. To avoid any call backs and delays due to personal items, clean and organize a little. Make sure there is a pathway to all major systems (Furnace, Air Conditioner, Electrical Panels, Under-sink Cabinets). Move clothing in a closet that has an attic access. Take children’s toys out of the bath tubs. Allow entry into the crawl-space and attic. You get the idea.

3) Leave the utilities on. Unless there are preexisting safety concerns or a licensed professional has turned them off, the utilities should be left on as usual. This allows the inspector to test each major component within the home. If the home has been vacant for some time and the utilities cannot be turned on, make sure all parties are aware of it prior to the inspection.

4) Take Fido to the park. I know, I know…Fido is just the sweetest Great Dane that has ever lived and he would never bite a guest. That’s great. Well, Fido may decide that the unfamiliar inspector who looks different, is poking around the food dish and is stepping on his favorite squeaky toy is actually NOT welcome today. It’s an awkward situation for the inspector, and for Fido. Make plans to keep the pooch outside when the inspector is inside, or vise versa. Although we are “Pet Friendly” inspectors, and your pet snake is very cool, please keep him in the cage today….locked!

5) Take yourself to the park. (Or the Mall). It’s your home so it is obviously your choice, but there really isn’t any point in staying in the house while the inspection is taking place. What we prefer at Green Door Home Inspections is to meet the owner at the scheduled time for a handshake and to discuss anything that hasn’t already been addressed. Let us know if you’d like a call when we are finished up. If you decide to stay throughout the inspection, please, give us a little breathing room. This is not the time to discuss concerns with your home, brag about paint colors, or to showoff your doll collection. These inspections can take a lot of time, lets get it done as efficiently as possible.

Spend a few minutes following these tips and preparing for your home before the inspector arrives to ensure a smooth process without the call backs.

10 step guide to preparing your home for Winter.

It’s that time of the year again! Take advantage of the Fall weather and knock out these 10 steps before the snow comes. A little maintenance goes a long way, and it isn’t very difficult.

1) Add caulking around doors and windows: Caulking is inexpensive, easy to install and very important for weatherproofing your home. Find the gaps and cracks on the interior and exterior and seal them up.

2) Replace worn weatherstripping around door jams: Weatherstripping is the rubber or foam strip that helps seal your doors. Over time, they wear out and let the conditioned air escape to the outdoors. Check the entire area around the door. If you can see daylight around the perimeter of a door when it is shut, you’re losing energy.

3) Drain irrigation systems: Water left sitting in the irrigation system can freeze and cause major damage. Hire a pro to blow out the system with compressed air and turn off the entire system until spring.

4) Disconnect hoses: Turn off your exterior water taps, drain the hoses and store them inside or in a garden box.

5) Check your downspouts: Accumulated snow on your roof will eventually melt, sending hundreds of gallons of water down the gutter system. Make sure it gets diverted away from your house with downspouts and extensions. Check the regularly for ice build-up and other clogs.

6) Have the chimney inspected: Even if you do not use your fireplace as a primary heating source, you should have the chimney inspected and cleaned every year. If there is a problem with your furnace, you will need heat until it is fixed.

7) Have your furnace serviced: It goes without saying, your furnace is incredibly important during the winter. An annual service by a professional will help keep it running smoothly and efficiently.

8) Store your mower: Gasoline engines need to be properly maintained and prepped for storage. Check the manufacturers recommendations regarding long term storage of the engine. You may need to drain fluids and use fuel additives. If your mower takes batteries, charge them up and store them indoors. They will last much longer.

9) Insulate water lines: If you have water lines running inside of an exterior wall, consider adding insulation to them. Check your basement, crawlspaces and garages as well. Freezing weather can wreck havoc on the water inside these lines. If you find a frozen pipe during the winter, call a professional plumber immediately. Attempting to thaw out a plumbing pipe can cause it to burst. Call a pro!

10) Service the water heater: Water heaters need maintenance as well, and they will inevitably be working harder in colder temperatures. Now is a great time to have a professional drain the tank and service the entire unit.

There are plenty of other steps you can take to prepare for the Winter months, but these are some of the most important ones. Most of these can be completed by yourself and a professional in just a couple days. If you want more information about your home and help deciding what needs to be done, consider an Annual Home Maintenance Inspection by a Certified Professional Inspector.

Do I really need a Home Inspection?

This is a booming Real Estate market. Homes are being listed and sold so fast (30days) that buyers are forced to make decisions quickly and make offers on the spot. One tactic buyers use is to forgo an inspection with their offer in order to convince a seller that they are ready to move in, no matter what. But, is that safe? Do you REALLY need an inspection here in Castle Rock, or anywhere else?

The answer is YES. Even the best kept home can have material defects and hazardous issues that you may not notice by just doing a simple walk-through. Are they selling with an unknown issue? Is there a leak behind that newly painted wall? Are there signs of mold or other air quality issues? Has there been mass water intrusion into the basement or crawl-space in the past? Are there repair costs that will affect your wallet down the road? The list goes on. So what is a buyer to do?

Stick to your guns. Schedule an inspection from a Certified Professional Inspector and move quickly. If all of your other ducks are in a row……(ie, pre-approval letters, down payment plans, earnest money etc)…. then find an inspector with flexible work hours and the ability to schedule quickly online. Show the sellers that you are motivated and ready, but smart.

Even if you have to adjust your offer (Higher) to be more attractive, you can save money in the long-term with an inspection. The cost of an inspection (we start at $365 for small homes) is pennies compared to the home values in the Castle Rock area (Estimated median house or condo value in 2016: $445,400) and NOTHING compared to expenses for major repairs in your house. Armed with a strong offer and a home inspection report, you can work with your realtors to negotiate a final sale price.

It’s possible to lose the negotiation battle when you demand an inspection first (I did!), but you will be much better off knowing that a qualified professional has helped you with your due diligence and is working for YOU. These homes are expensive and can be life-long investments. Don’t get wrapped up into the hype and purchase something you will regret later.

What's Included in a Home Inspection

Infographic courtesy of Spectora

How to know if your Radon Mitigation system is working.

Radon Mitigation systems are typically installed in a home to reduce the radon levels to an acceptable amount. The EPA is the governing body that gives us guidance on what an acceptable amount of Radon actually is. That magic number set by the EPA is 3.9 or lower. Ultimately, it is up to the homeowner to decide what level of radon is acceptable.

Now that a system is installed, how do you know it works? The levels were likely too high at some point and you (or the prior owner) decided to have the system installed, right? Well, Radon Gas is almost NEVER reduced to zero (no measurable radon) inside of a home, even with a mitigation system installed. Yep! You likely still have radon gas in your home.

The ONLY way to know if a system is reducing radon levels enough is to perform a Radon Test. That’s it. By far the biggest misconception I see with homeowners and buyers is that they do not need to test for Radon once a mitigation system is installed. This is incorrect and a very dangerous piece of advice. After a system is installed, the home should be tested to confirm the system works within 2 weeks. That way any corrections and improvements on the system can be made quickly. After that we recommend testing again every 2 years, during any change of ownership, after any remodels or renovations and after HVAC upgrades in the home.

What about this little device on the system, isn’t this showing the levels of Radon?

Radon Mitigation System Manometer
This device is NOT telling you anything about radon levels in the home. Specifically, this device is called a manometer and it indicates pressure within the system. Basically, the radon fan is either on or off at anytime, and this is your way of knowing. An active mitigation system will have a radon fan running 24/7. The fan is usually installed out of sight (in the attic, exterior etc..). When the manometer fluid levels out, it indicates there is no suction in the system so the fan is currently off. That lets you know the system is not working properly, needs repairs and radon gas levels are likely rising. The manometer simply gives the homeowner a convenient way to check on the system at anytime to make sure the fan is running. It’s also important to note that you may not have a manometer at all. They are only necessary when you have an “Active” system, meaning a fan is permanently installed. Some radon mitigation systems are designed to be “Passive”and do not need a manometer. This is common on new construction.

There are devices that actively monitor radon levels in the home and are quite accurate. This product by Airthings is a good example. A homeowner could install this device and use it in a similar way that a carbon monoxide detector works. It is important to note that while these devices can help indicate current Radon levels in a home, they do NOT replace a short-term radon test performed by a professional. Radon professionals should be certified to perform the test, use only approved devices that are approved by the NRPP, and use devices that are calibrated yearly in an approved lab. This is one area where it pays to hire a pro.

The absolute ONLY way to know the average radon levels in a home is to perform a test. We usually perform this test for our clients during a home inspection, but can do it at anytime. Don’t take it for granted, if you have a mitigation system installed you still need to test the home for Radon Gas.

What is a Range Anti-Tip Device?

Did your inspector make a comment about the lack of an Anti-Tip device? Don’t panic! Let’s take 2 minutes and discuss this little device.

An Anti-Tip device is a very simple bracket that provides a very important safety feature. It is designed to prevent a fixture from tipping over unexpectedly.

It’s that simple. Nowadays, we see these installed on large dressers, televisions and even refrigerators. They cost less than $10, and are often included for free with a new appliance, like your freestanding range/oven.

This is one of the most common issues we find during a typical home inspection. Our inspectors simply pull back on the top oven and if it starts to tip over, we set it down and make a recommendation to have the Anti Tip device installed.

How big of a deal is the lack of this device? Well, that is up to you (the new owner). If you have small children, the door to the oven could be in the open position and used like a ladder. The now weighted down door could cause the entire oven to tip over, injuring the child. Again, it’s up to you. As inspectors, we are working for our client’s best interest. We’d rather you are aware and make a decision, than not know at all. If you’d like to read more about the device, read this from the Consumer Product Safety Commission.

Recently move to the Front Range?

Here are 5 tips for homeowners that are new to Colorado’s beautiful Front Range.

1) Hail is coming. Update your home and auto insurance if you need to. Park the cars in the garage. Keep the pets inside….etc. Do what you have to do, but the hail is definitely coming. Several areas along the Front Range are considered “Hail Alley”. Denver, Aurora and Colorado Springs are among the Top Ten most hail prone cities in the US. Start off with a thorough roof inspection, and have it checked out as often as needed throughout the year. A good rule of thumb is to inspect each year in the spring, and after any hail storms in your area. Most roofers do this for free or a minimal charge. When replacing existing shingles, ask your roofer about upgrading to a Class 4 shingle. The extra protection that class of shingle offers may better the best choice, and may lower your insurance.

2) It’s dry here. Contrary to popular belief the Front Range of Colorado is very dry, especially during the Winter months. Home humidity levels can easily drop to under 20% during the heating season and that can effect not only the comfort of your home, but individual health issues as well. Even wood furniture and cupboards can be negatively affected by low home humidity levels. Consider a running a humidifier near your bed when you sleep. Also, it is quite common in Colorado to install a “Whole Home” humidifier onto your forced air furnace. They usually cost a few hundred dollars, humidify the entire house and they do not require a lot a maintenance. Contact a qualified HVAC pro to look for options.

3) The sun. It matters. How would you like to never again have to shovel your driveway in the Winter? Do you like shade on the back patio or do you want to bake in the summer UV rays? The way your home is situated relative to the sun really does matter here. Year round, the sunlight is intense, much more intense than most other places in the US. Before you decide on a home, consider which direction the home faces and where the sun will be a various times of the year. You will notice North facing driveways are always full of snow and icy, while their neighbors across the street with South facing driveways are melted and clear by noon. In the summer, the back patio or deck may be too hot for activities in the afternoons, so folks will opt to hang out in the front of the house or garage where there will be more shade. Also, do not forget the building materials; Buy the UV protected paint for the house, Consider window treatments etc. You’ll even need to adjust your sprinkler heads in the lawn to account for direct sun. Trust me, the sun matters on the Front Range.

4) Expansive soil. An entire book could be written here, but I’ll give you the basics. There are certain types of soils in the ground in Colorado (actually clays, like bentonite) that can swell when they are exposed to ground water. They swell a lot actually. They swell so much that they can literally lift up the foundation of your house. So what does this mean for the typical homeowner? Keep water away from your foundation. Do yearly gutter maintenance, and check your home exterior, basement and crawl-spaces after any hard rains. This is important just about everywhere in the country, but the expansive soil here makes it even more important along the Front Range. Also, check with your local building department before your basement remodel begins. Many areas require a “Floating Wall” to be built to account for basement floor movement.

5) There is gas in your home. Radon Gas to be more specific. Radon is a colorless, odorless, naturally occurring yet highly dangerous gas that is very common in high concentrations in some soils. This gas can leak into your home through the basement or bottom floors and is actually the number 2 cause of lung cancer in the country. Sounds horrible you say? Well, it is very real and very dangerous, but it is also very easily mitigated. Most real estate transactions in Colorado will have a simple Radon test performed during escrow. Then, if necessary, a Radon Mitigation system can be installed on the home. These systems range from $500 to $2000 to install and require almost no maintenance. Your neighbor may need one, your home might not. You don’t know until you do a test. Get a test by asking your home inspector or real estate agent. Read more about Radon here.

Appliance life expectancy.

Every appliance in your home has an average life expectancy. Some appliances will last quite a long time ( I owned a 30yr old gas furnace at one point!). Others, not so much. So how do you know when to expect a replacement unit?

Several factors go into the expected longevity of any appliance like make, model, maintenance schedules and usage. Some manufactures may disclose that number for you, or you just have to do your own research.

Here is a guide from Consumer Research showing average life expectancy from the most common appliances in your home:

So, how old is your appliance? Check the manufacture’s label that is usually permanently installed on the unit itself. There may be an exact date of manufacture on that label, or there may be a code. Calling the manufacturer and providing the code and/or serial number is usually enough to verify age. You can also use this free website to look up most appliance information.

If you have any trouble, give us a call. As a home inspector here in Colorado, I can look up the information for you and find out if there have been any recalls on that specific unit as well. Here in Castle Rock, Colorado, Winters can be especially hard on furnaces and summers very hard on air conditioners. Do your maintenance and plan on budgeting for that inevitable replacement.

Post-rain inspection for the Homeowner.

How about that rain? Now is a great time to check your home for water issues.

When it rains hard in Colorado (like the storms last week!) take that opportunity to see how your home has handled the water. I recommend having a professional look over your home every year, but you can do this one on your own. Here is a quick (10 min) post-rain inspection anyone can do:

1) CHECK for pooling. Take a walk around your home and look for any water pooling, especially near the foundation.
2) CHECK for leaks. Take a peek in the attic and look at the ceilings. Look for any signs of water intrusion or leaks from the roof.
3) CHECK gutter system. Downspouts and gutters are essential to controlling the water from your roof. Look for clogs and loose/broken connections.

When it rains hard in Colorado, like the storms last week, take that opportunity to see how your home has handled the water.

Any questions? Give me a call!
720-598-0111
www.greendoorHI.com

#gutters #homeowner #diy #leaks